Starting learning to code with Team Treehouse

So, contrary to what I said in my previous blog post about what my next steps would be, I decided to move on to Team Treehouse (they sent me an email for a free month).  Team Treehouse is similar to sites like Codecademy and Code School in that it’s interactive.  However, unlike Codecademy, it uses video lessons to teach and then uses quizzes to reinforce the knowledge.
I decided to do the “Become a Web Developer” Learning Adventure, which covers everything from HTML/CSS to Git, Ruby, jQuery, JavaScript, CoffeeScript and relational databases.  So far I’ve completed the first section which was “Build a Simple Website”.  In this, I got a refresher on HTML, and ended up making a one page website for a cupcake shop using CSS.  It gave me a good primer on grids which is something I haven’t really worked with before.  Content-wise though, I found it to be a very basic level course that took me about an hour.  I skipped many of the videos and jumped to the quizzes because I’ve done enough HTML in my life to squeak by.  Sublime Text helps me with any syntax I’m not 100% rock solid on.

One thing I really like about Team Treehouse is the videos.  The instructional videos are surprisingly high quality and high budget.  They use onscreen writing of code along with little diagrams or other visual displays to walk through important concepts.  The learning is concise, professional, and so far bug-free.  The text editor for the quizzes is slightly slow, and I don’t feel that the course actually tests you on ALL of the content so I’m not sure how good the absorption will be when I am learning something brand new to me.

You can see my profile here.  It has all the standard gamification elements like badges.  It also has an overarching video adventure that unveils a story as you progress through the courses, which I’m assuming encourages retention from all the people with good intentions who don’t stick with a program.

I’ll update as I go throughout the program.  If you want to sign up, click this referral link so that I get a free subscription. =)

Done with One Month Rails: A Summary

Today I finished up the One Month Rails course in exactly 15 days.  I was basically a Weekend Warrior, in that I didn’t work on this much during the work week.  I think it was a substantial course and worth the $20 that I paid for access to it.

Pros:

+  Getting me setup with an environment, deploying to Git and Heroku was probably the best part about this.  Compared to Codecademy or other such sites, this course actually got me started on the path to making a real app and showing it to the world within the very first lesson.  That is a huge motivator to keep going, and also gave me essential knowledge that I need to start app #2.
+ His teaching was slow and his voice is calming and his delivery is great.  I like how he explained why we’re doing everything.
+ I feel like I have a solid knowledge of searching the web for answers to things and importing gems that might be useful to my project.
+ I got a brief glimpse into Ruby syntax, though I don’t necessarily understand it yet.
+ I have a working app at the end that is basically Pinterest minus the boards that I can show to people.  This is exciting.

Con:

+ I don’t think it taught me how to code, at all.  It taught me the basics of creating an app with Rails and how to edit/modify things.  I feel like I could build any number of apps and I could probably Google for the code snippets required to add just about any functionality.  Do I feel that would make me a “Rails developer”?  No.  I don’t really understand how to write any Ruby code.

I liked this course. It gave me the knowledge that I need to start making another app, once I come up with an idea.

My next steps:

Do the Ruby course at CodeSchool and Codecademy so that I can understand the syntax of that language better.  Read Why’s Poignant Guide to Ruby.  Then, I’ll do Michael Hartl’s Rails tutorial.  After that, I’m going to build something and this will give me time to figure out exactly what. =)

Adding user profiles

Right now we have the ability to edit our own user profiles (our email address, name, and pw) but what if we wanted to be able to click on a user’s name and view a profile page for them?  That’s what we’re doing here.

I don’t need to create a whole new scaffolding for users like I did for pins, because a scaffolding allows us to CRUD (create, read, update, destroy) and we can already create users, delete users, etc.  What we want to do is modify the Devise gem, so if you Google search for “show page Devise” there is a StackOverflow question that helps us do this very thing.

First thing is running:

$ rails generate controller User show

This creates a user controller file automatically  us and the show action is blank as you can see here:

class UsersController < ApplicationController
  def show
  end
end

Then I go into my pins controller and copy the top line of the show action, which is:

@pin = Pin.find(params[:id])

And change pin to user in that code and put it in that empty show action in the Users controller.

Then I open up the Users-> Show view (which was automatically created for us) and replace the contents with this (which doesn’t show up well when pasted in WordPress).  Now we edit our routes file and under devise_for :users we put in

match 'users/:id' => 'users#show', as: :user

Finally in our Pin view we replace part of the code:

 .
  .
  .
        <strong>
            Posted by <%= link_to pin.user.name, pin.user %>
        </strong>
  .
  .
  .

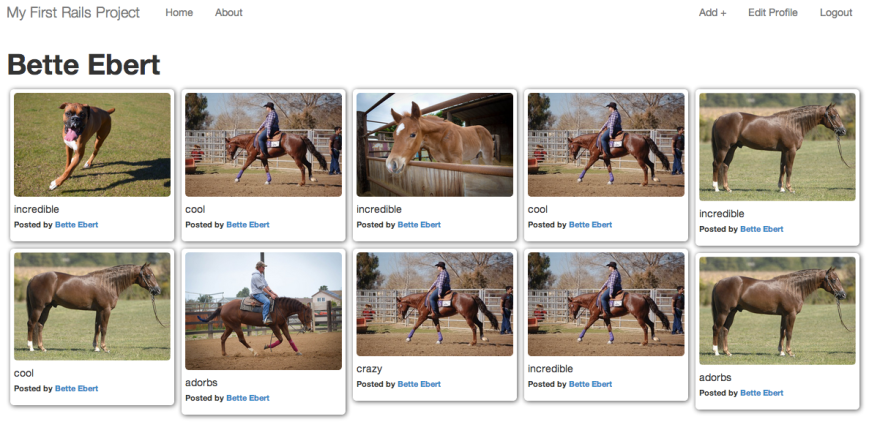
Now clicking on someone’s name on the index page brings up a user profile showing all their pins.

Screen Shot 2013-04-08 at 5.35.41 PM

Adding pagination

Pagination was one of the easiest things to add.  I installed the will_paginate and bootstrap_will_paginate gems.

I edited my Pins controller:

.
.
.
  def index
    @pins = Pin.order("created_at desc").page(params[:page]).per_page(20)
.
.
.

At the bottom of app/views/pins/index.html.erb I added:

<%= will_paginate @pins %>

And now I have good looking pagination!

Screen Shot 2013-04-07 at 9.55.45 PM


Creating dummy users with Faker

This is how you add dummy users and image uploads with Faker.  Install the gem by adding it to your gemfile:

gem ‘faker’, ‘1.1.2’

I made a folder called ‘sampleimages’ in my app and put a few different images in it.  Next, I create a new ‘task’ under lib => tasks and call it populate.rake.  I fill it with the following:

namespace :db do
  desc "Fill database with sample data"
  task populate: :environment do
    10.times do |n|
      puts "[DEBUG] creating user #{n+1} of 10"
      name = Faker::Name.name
      email = "user-#{n+1}@example.com"
      password = "password"
      User.create!( name: name,
                    email: email,
                    password: password,
                    password_confirmation: password)
    end

    User.all.each do |user|
      puts "[DEBUG] uploading images for user #{user.id} of #{User.last.id}"
      10.times do |n|
        image = File.open(Dir.glob(File.join(Rails.root, 'sampleimages', '*')).sample)
        description = %w(cool awesome crazy wow adorbs incredible).sample
        user.pins.create!(image: image, description: description)
      end
    end
  end
end

Lastly, I run $ rake db:populate and this makes my site look pretty awesome on development!

Screen Shot 2013-04-07 at 9.40.51 PM


Image uploading from a URL

Right now my site can only upload images from my computer, but I want to make it upload from URL instead.  So that’s what I’m going to be doing now. 🙂

If I load the schema file in the db folder, I can see that right now I’m storing the following information about my pins:

create_table "pins", :force => true do |t|
t.string "description"
t.datetime "created_at", :null => false
t.datetime "updated_at", :null => false
t.integer "user_id"
t.string "image_file_name"
t.string "image_content_type"
t.integer "image_file_size"
t.datetime "image_updated_at"

If I want to add image URL in there, I first need to create a migration by doing:

$ rails generate migration AddImageRemoteUrlToPins image_remote_url:string

Now I need to run rake db:migrate to make the database changes.

Now we need to edit the model to tell it what to do if a user wants to upload an image from a remote URL.  I need to  edit the pin.rb model file and make the image_remote_url accessible by adding the following to attr_accessible:

attr_accessible :description, :image, :image_remote_url

Also apparently something with Ruby is that once I define an attribute I can dig into it deeper.  At the bottom of the pin.rb file I add:

	def image_remote_url=(url_value)
 		self.image = URI.parse(url_value) unless url_value.blank?
 		super
 	end

So that was some confusing stuff right there.  Apparently in this case, super means that it’s going to fall back on whatever functionality was in the original method.  self in self.image refers to the pin.

Next we need to edit the _form.erb file so that it’s added to our views so people can try to paste in a URL.  I add this to the file:

<%= f.input :image_remote_url, label: "or enter a URL" %>

Bam, done.

Using Amazon S3

So I noticed that when I accessed my app on Heroku and uploaded images, that if I left them there they would eventually go away and be dead images.  I figured it had something to do with how Heroku doesn’t store images, and I was correct.  Every so often (maybe when the server powers down?) all images and uploads are deleted to prevent people from using Heroku for file storage.  The solution here is Amazon S3, and I’ll use this guide to do it.

I registered for an Amazon Web Services account and waited for it to be activated.  Next I need to paste the following into my production.rb file:

# Configuring Amazon S3 for Paperclip file uploads
config.paperclip_defaults = {
  :storage => :s3,
  :s3_credentials => {
    :bucket => ENV['AWS_BUCKET'],
    :access_key_id => ENV['AWS_ACCESS_KEY_ID'],
    :secret_access_key => ENV['AWS_SECRET_ACCESS_KEY']
  }
}

Instead of actually entering in my AWS access keys (which would be really insecure since I’m uploading all of this code to a public repo on Github) I’m going to use those environment variables (ENV) which I set via terminal and don’t have to enter in my code.

After I add that code, I’ll commit and push to Git & Heroku.  Image uploads still don’t work though, because we never set those variables.  That’s okay, I can do that now.  To do this I put the following in Terminal:

$ heroku config:add AWS_BUCKET=your_bucket_name
$ heroku config:add AWS_ACCESS_KEY_ID=your_access_key_id
$ heroku config:add AWS_SECRET_ACCESS_KEY=your_secret_access_key

If I ever want to check on these variables again in the future I can put $ heroku config in the Terminal.  Now, it works!  My images are uploading to S3 and the app is still hosted on Heroku.

Making my pins look good

So my pins are working and people can upload images, but what if I want it to look good?  Right now, it definitely doesn’t.  So we’re going to use jQuery to make it look better.

jQuery Masonry is a script that will make my images dynamically resize based on position and the size of the browser to give it that “pinteresty” look.  Since there is no gem for this, we have to download the script (jquery.masonry.min.js)  from scratch.  I download it and then drag it into the Vendor -> Assets -> JavaScripts folder.  Then we have to ‘require’ it in our application.  In App -> Assets -> Javascripts I open up application.js and add //= require jquery.masonry.min.js.

So it’s now installed, but I need to start working with it.  I’m going to open up the Views -> pins -> index.html file.  I basically get rid of everything because I no longer want the pins to be displayed in a handy table.  I changed it to:

Screen Shot 2013-04-04 at 10.26.39 PM

Then I open up the _pin partial and get rid of all of the table tags and put it all include a “box” div class.  I notice that this screenshot is missing a ” after the box div class…be sure to add that. 😉

Screen Shot 2013-04-04 at 10.28.25 PM

Finally, I open up pins.js.coffee under App -> Assets -> javascripts and then add the following bit of jQuery (actually CoffeeScript, and there is a nice converter from JS to Coffeescript here).

jQuery ->
	$('#pins').imagesLoaded ->
		$('#pins').masonry itemSelector: ".box"

This is basically telling Rails to run this jQuery after the page is loaded.  The code for it (before converting to CoffeeScript) is here.  If I wanted to do JavaScript instead I could have just made any new file in the javascripts folder, or the lazy way to do it would have been to put that code in the applications.js file instead.

Next we need to do some custom CSS styling.  In the styles.css.scss file under App -> stylesheets, I need to add the following to the bottom:

/* Required for jQuery Masonry */
.box {
    margin: 5px;
    padding: 5px;
    font-size: 11px;
    line-height: 1.4em;
    float: left;
    -webkit-border-radius: 5px;
    -moz-border-radius: 5px;
    border-radius: 5px;
    box-shadow: 1px 1px 10px #444;
    width: 214px;
}

.box img {
    diplay: block;
    width: 100%;
    -webkit-border-radius: 5px;
    -moz-border-radius: 5px;
    border-radius: 5px;
}

.description {
    margin: 10px 0 5px;
}

Next we have to add the “Add new Pin” link back because we deleted it.   We’ll do this in the header by adding this to the header.html:

Screen Shot 2013-04-04 at 11.02.46 PM

Next we wanted to add the person’s name who uploaded the pin.  In _pin.html I added the following highlighted portion:

Screen Shot 2013-04-04 at 11.03.48 PM

Next I want to make the image clickable to make larger instead of people having to click on the “show” link.  We do this by taking the show link and applying it to the image.

So  I change:

<%= image_tag pin.image(:medium) %>

To:

<%= link_to (image_tag pin.image(:medium)), pin %>

Next we want to reverse the order so the newer pins show the top.  We do this in the controller for the pins.  In the def for the index we change

@pins = Pin.all

to:

 @pins = Pin.order("created_at desc")

Easy!  Next I want the root of our application to go to the pins instead of that index page.  To do this we open the routes.rb file under config -> routes.  And where it’s currently set to:

root :to => ‘pages#home’

We change that to:

root :to => ‘pins#index’

Finally, we want to still use that fancy One Month Rails page if people are not logged in.  Actually, I kind of don’t want that but it’s required for this damn tutorial so I’ll do it I guess…  And I need more practice with partials.   We just rename home.html.erb to _home.html.erb and now it became a partial.  And then we have to call it in our index page that’s rendering the pins currently by adding <%= render ‘pages/home’ %> to the top of it.  Bam, success.

Check out my site.  It’s like a real working application now.

http://young-basin-3485.herokuapp.com/

Uploading images with my Rails pinterest-esque site

First thing, I needed Image Magick, which I got by typing in Terminal:

$ brew install imagemagick

I already had Homebrew installed from following some other tutorial, which is why it worked so smoothly.  Next, I’m going to install the Paperclip gem, a popular gem for image uploading.  I just need to open up my gemfile and add

gem "paperclip", "~> 3.0"

in the top section. I run “bundle” in Terminal and it downloads and installs Paperclip.  The first thing to do to get started is to run the following:

$ rails generate paperclip pin image

In that command, ‘pin’ is the name of the model, and ‘image’ is what we want to call the type of file people are uploading.  When we run this, it generates a migration so we have to run rake db:migrate like usual.  Next we have to open up the pin.rb model and make a few adjustments.  Basically we need to make :image accessible, and then validate the attachment in a number of ways: presence, filetype and image size.  Here is the new code:

class Pin < ActiveRecord::Base
  attr_accessible :description, :image

  validates :description, presence: true
  validates :user_id, presence: true
  validates_attachment :image, presence: true, 
  											content_type: { content_type: ['image/jpeg', 'image/jpg', 'image/png', 'image/gif']},
  											size: { less than: 5.megabytes }

  belongs_to :user
  has_attached_file :image
end

Now we update the view.  This is a piece of cake.  Just add <%= f.input :image, label: “Upload an image” %> above the description in the _form.html file.  Also in this file, I need to add notifications for the other validations that we just set in the previous part. I add this under the other notification:

  <%= f.full_error :image_file_size, class: "alert alert-error" %>
  <%= f.full_error :image_content_type, class: "alert alert-error" %>

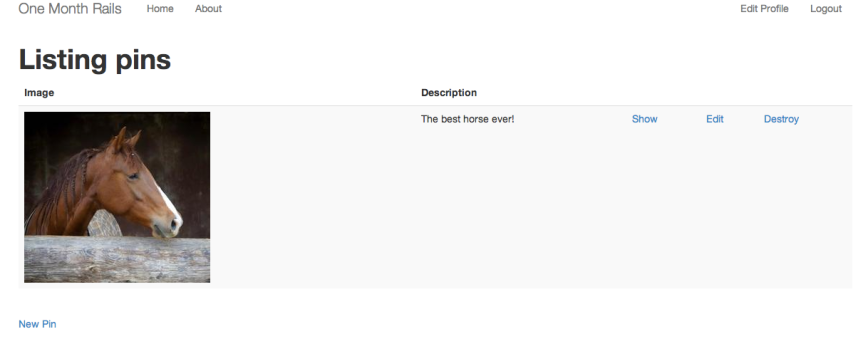
Now we have to update the show view.  Above the description I add: <%= image_tag @pin.image %>.  And we have to update the index view.  So first in the index.html we add another column header by doing      <th>Image</th>.  And then, in the _pin.html partial we put in <td><%= image_tag pin.image %></td>.  Now it works!

The problem is, the image I uploaded (of my horse Rosie) is too big.  Apparently Paperclip has image styles to help us with that.  In pin.rb model change the has_attached_file line to:

has_attached_file :image, styles: { medium: "320x240>"}

And then in my pin.html file I change the image_tag pin.image part to:

<%= image_tag pin.image(:medium) %>

Since this all happens during processing, it will only happen when the image is uploaded.  I reuploaded and now this looks awesome.  These are saved into the public folder of our application under a new folder called System.  We probably want to add this stuff into our .gitignore because we don’t want the images we’re playing around with to end up pushing live.  I opened up the .gitignore file and added this to the bottom:

#ignore paperclip uploaded files
/public/system

And now, holy crap, I have a running Pinterest style website with image uploading live on Heroku!

Screen Shot 2013-04-04 at 12.45.08 AM

Associating pins with users

Now I have this site where people can upload pins, which are just descriptions right now but will eventually also be image uploads.  The only problem is that they’re not associated with users, so it’s just one giant repository of pins with no attribution.  Time to fix that!

First thing, I’m being introduced to the Rails console.  How exciting. =)   I access this by entering ‘rails console’ in Terminal, which changes me to be in the Rails environment.  I can now type in Ruby code, like say, math, and it will work.  This will be useful because it will help me see the guts of my application in ways that the views will not.  Like, I can access the models that we have created (pins and users).  In each of those models, there is a class at the top of the file which is something I can specifically access via the console.

Like for example, since the class for user is User, I can enter User.all in the console and it will show me:

User Load (0.2ms) SELECT "users".* FROM "users"
=> [#<User id: 1, email: "test.user@me.com", encrypted_password: "$2a$10$ezCykZohTGcirSq.NfBBBOiE5TEU24vpQ1GWuEblX7xT...", reset_password_token: nil, reset_password_sent_at: nil, remember_created_at: nil, sign_in_count: 7, current_sign_in_at: "2013-04-01 00:48:53", last_sign_in_at: "2013-04-01 00:43:44", current_sign_in_ip: "127.0.0.1", last_sign_in_ip: "127.0.0.1", created_at: "2013-04-01 00:03:51", updated_at: "2013-04-01 00:54:05", name: "Tami Baribeau">

Hey, that’s me!  I could also do Pin.all and that gives me the info you’d expect it to.  So now we’re finally digging into the meat of all of this, which is really helpful for someone like me who wants to not just know HOW to do things but also why they’re doing what they’re doing.

Basically, in the pins controller it created a number of actions automatically.  My index, show, new, create, update, and destroy.  Each of those things has a respond_to block which basically created an API for us for free by using json format to give us access to all this infoz.  This is a bonus of running a scaffold.

Let’s just look at the index action:

  def index
    @pins = Pin.all

    respond_to do |format|
      format.html # index.html.erb
      format.json { render json: @pins }
    end
  end

Ignoring the respond_to part and just looking at the first line.  @pins is the variable that was created, and it’s being set to the Pin.all, the same method I ran in the Rails console.  So basically, the first thing being called when I load up that index page (at http://localhost:3000/pins) is the Pin.all command, which is why all the pins show on that page.  The @ sign makes it a global variable, giving us access to it throughout the entire application.  We need it to be a global variable so that our VIEW has access to it.  Makes total sense!

Now we’re moving on to the show action.  It looks like this:

@pin = Pin.find(params[:id])

Basically, I can do Pin.find(1) in the rails console and it will give me back the details for only the Pin with the ID 1.  Basically in the show action, it’s getting the ID parameter from the URL when I click on ‘show’ on a specific pin.  So that’s how that works.

So now we’ll establish the connection between a user and a pin.  The first thing to do is update our pin item.  I need to add a user_id to each database record, so in Terminal I have to run;

rails generate migration AddUserIdToPins user_id:integer:index

I made up AddUserIdToPins, apparently that doesn’t have to be anything specific.  I still don’t understand how it knows which database to modify.  What if I had two?  In fact, I DO have two…pins and users right?  I r confused.  Adding index told it that someday I’d want to be searching by that value.  After that I have to create the migration and then run rake db:migrate.   I then can’t immediately see the new column, I have to shut down the Rails console with ctrl-d and then open it back up…I can run @pin = Pin.last and see that my database has a user_id attribute although it is nil.

Now we need to establish that users have pins and pins have a user.  To do this we go inside our Models folder.  Inside of the user.rb model, at the end I add:

has_many :pins

Under the pin.rb file, at the end I add:

belongs_to :user

This is one example of a specific association, but more of them can be found here.

So now, we have other things we can do in Rails console (after we restart it again with Ctrl-D). I can now do Pin.last and then Pin.user and it will give me the user id of the last Pin that was entered.  It’s nil right now because we haven’t saved any pins with user ids yet.  I could also do User.last to get the last user, and then User.pins which would show me all of their pins with some fancy SQL action.

So how do we associate a pin with a user when it’s created?  When you click “new pin”, we’ll want to make sure it’s saving the ID of the person who is creating the pin to the pin itself.  But first we should require them to be logged in to access the new pin page.  To do this we add this to the top of our pins controller:

before_filter :authenticate_user!, except: [:index]

The authenticate_user! part of this is something that Devise gives us.  This is telling us that before running any of the actions on the page, make sure the user is logged in.  Except in the case of the index page which allows people to see all the pins.

So now we know someone will be logged in when they create a new pin, which is essential to saving their ID when the pin is created. 😉   We need to edit both the “new” action and the “create action”.    In the “new” action, Rails gives us an easy way to do this.  Instead of:

@pin = Pin.new

I’m going to do:

@pin = current_user.pins.new

Likewise, in the “create” action we change:

@pin = Pin.new(params[:pin])

to:

@pin = current_user.pins.new(params[:pin])

Now it’s saving user_id in the database which is great, but I can still edit other user’s pins which is no bueno.    I gotta change my “edit” action from:

@pin = Pin.find(params[:id)

to:

@pin = current_user.pins.find(params[:id)

And I do the same thing in update and destroy, naturally.

Next, since we have a user associated with each pin, we can show a user’s name when they’re on the page of their pin.  That’s easy, I just open the “show” view and then add  <%= @pin.user.name %> under the description part.  I wanted to delete the previous pins because they don’t have users and therefore generate ugly errors when I try to hit their show page, so I just do Pin.first.delete a couple times.

Now every pin I make in the future should have a user id associated with it, but just in case I’m going to open my pin.rb model and add:

validates :user_id, presence: true

Now we want to make sure the edit and destroy buttons only show up for the person who owns the pin.  So we open our _pin partial view (since that’s what the index is rendering somehow…even though it doesn’t have the same name and I’m still fucking confused about that).  I need to wrap the “edit” and “destroy” links inside a check like so:

 
<% if current_user == pin.user %>
    blahblah
<% end %>

Gotta do the same thing on my “show” page too to hide the “edit” link.  Easy peasy.

There you have it.  Next up, uploading images! 🙂